Running your own Mastodon server
With the great #TwitterMigration of 2022 following a certain billionaire taking over and subsequently behaving in ways that do not sit well with many, including myself, the vast majority of my social media family moved to one of two Mastodon servers … https://infosec.exchange and https://hachyderm.io/ … I myself have my primary account hosted on InfoSec.Exchange … but one of the cool things about the Fediverse is that you can install and run your own server. Why would you do that? I think there are 3 legitimate answers …
- Because you can. It’s a fun thing, you learn a lot, and have full control.
- Because you want a vanity handle.
- Because you want to create a new community of like minded people. For example there is no real Mental Health server, and so a few of us and considering doing that.
I have stood up my own servers mostly to learn as above but also with the potential to host a community. This post is a summary of the instructions I followed and some learnings :)
Before you begin
- You need a domain name. This is the name you type into your browser, like theintersection.app. There are many domain registration sites, I personally use https://domains.google/ because while I have antipathy to the ads side of Google, working there I saw how amazing they are at cloud infrastructure. You can always move the domain registrar later if you want.
- You need to make a choice on hosting. There are 3 common options:
- Hosted Mastodon. A lot of these platforms are currently not accepting new registrations due to the overload of migrations, but these are a fast and low cost way to get started. All the infrastructure and running of Mastodon is done for you (that’s what you pay for), you just create a server and attach your domain name to it. A partial list is provided here.
- Run a virtual server in the cloud. This means signing up for an account at somewhere like Amazon AWS, Google Cloud, Azure, Oracle Cloud, Digital Ocean and a plethora of others. You deploy the server and do all the configuration, you are paying for the hardware hosting, network traffic etc.
- Run a server yourself at home, the same as the item above, but you provide the hardware and do it all yourself. I am doing this, technically I’m running a VM to make it easier to snapshot and backup, but I also played with physical hardware as I went through many iterations of installing to see what worked best. I intend on migrating to a hosted server setup for reliability reasons, it’s fine when it’s just me messing around but if/when others rely on it, gotta be a little more serious.
- Prepare for the installation (assuming you go with item 2 or 3, if you went with hosted, the rest of this post does not apply to you, go have fun configuring!)
- Download and install or choose to deploy Ubuntu Server. I would recommend 22.04 LTS. I tried 22.10 but something has changed as the instructions continually failed and I couldn’t be assed figuring it out. You can choose many platforms, I find Ubuntu to be a well supported distro and easy to work with.
- Configure SSH keys. Do not use a username/password to SSH into the server, use SSH Keys. Assuming you are on a Mac or Linux:
- On the Mac/Linux run “ssh-keygen -t rsa” (minus quotes)
- On the Mac/Linux run “ssh-copy-id -i [path to the file you just created] serverusername@serverhost
- On the Mac/Linux run “ssh-add [path to the file you just created]
- You can now SSH to the server using that key. If you use a second laptop/desktop you will need to either repeat this or reuse the keys you just created (in security terms reuse is bad, in practical terms there are worse things you can do).
- Prepare the VM or server. These steps essentially update the server and apply appropriate security configurations as a baseline.
- Set up an SMTP relay, you will need to be able to send and receive email to create an account in your new instance. I followed these instructions to set up SendInBlue which is free for up to 300 emails per day, more than enough for my use case. You will create an account, configure your DNS domain and install the required packages of your server.
Now you can install Mastodon :)
- I unashamedly have used Linux Babe’s instructions as they work, every time. Just follow the instructions step by step, I literally copy/paste each command.
- Note that this is an “all-in-one” server, it will scale to a point, but if you end up hosting a larger population there will be scale out tasks down the line :)
- After the installation, browse to your new server, login with the first admin account and temp password provided, set a good new password and enable 2FA under Preferences-Account. This is the account you should use to configure the server, separate from your own daily user account.
- Invite your own personal account and start following and posting etc.
Post installation tasks
- Move the media storage to AWS S3
I started with these instructions which are fairly straight forward … Create an S3 bucket, set an API user to get a key/secret combo, install S3cmd and sync any existing information from the current /public/system folder, addlines to the .env.production configuration file and you’re good to go.
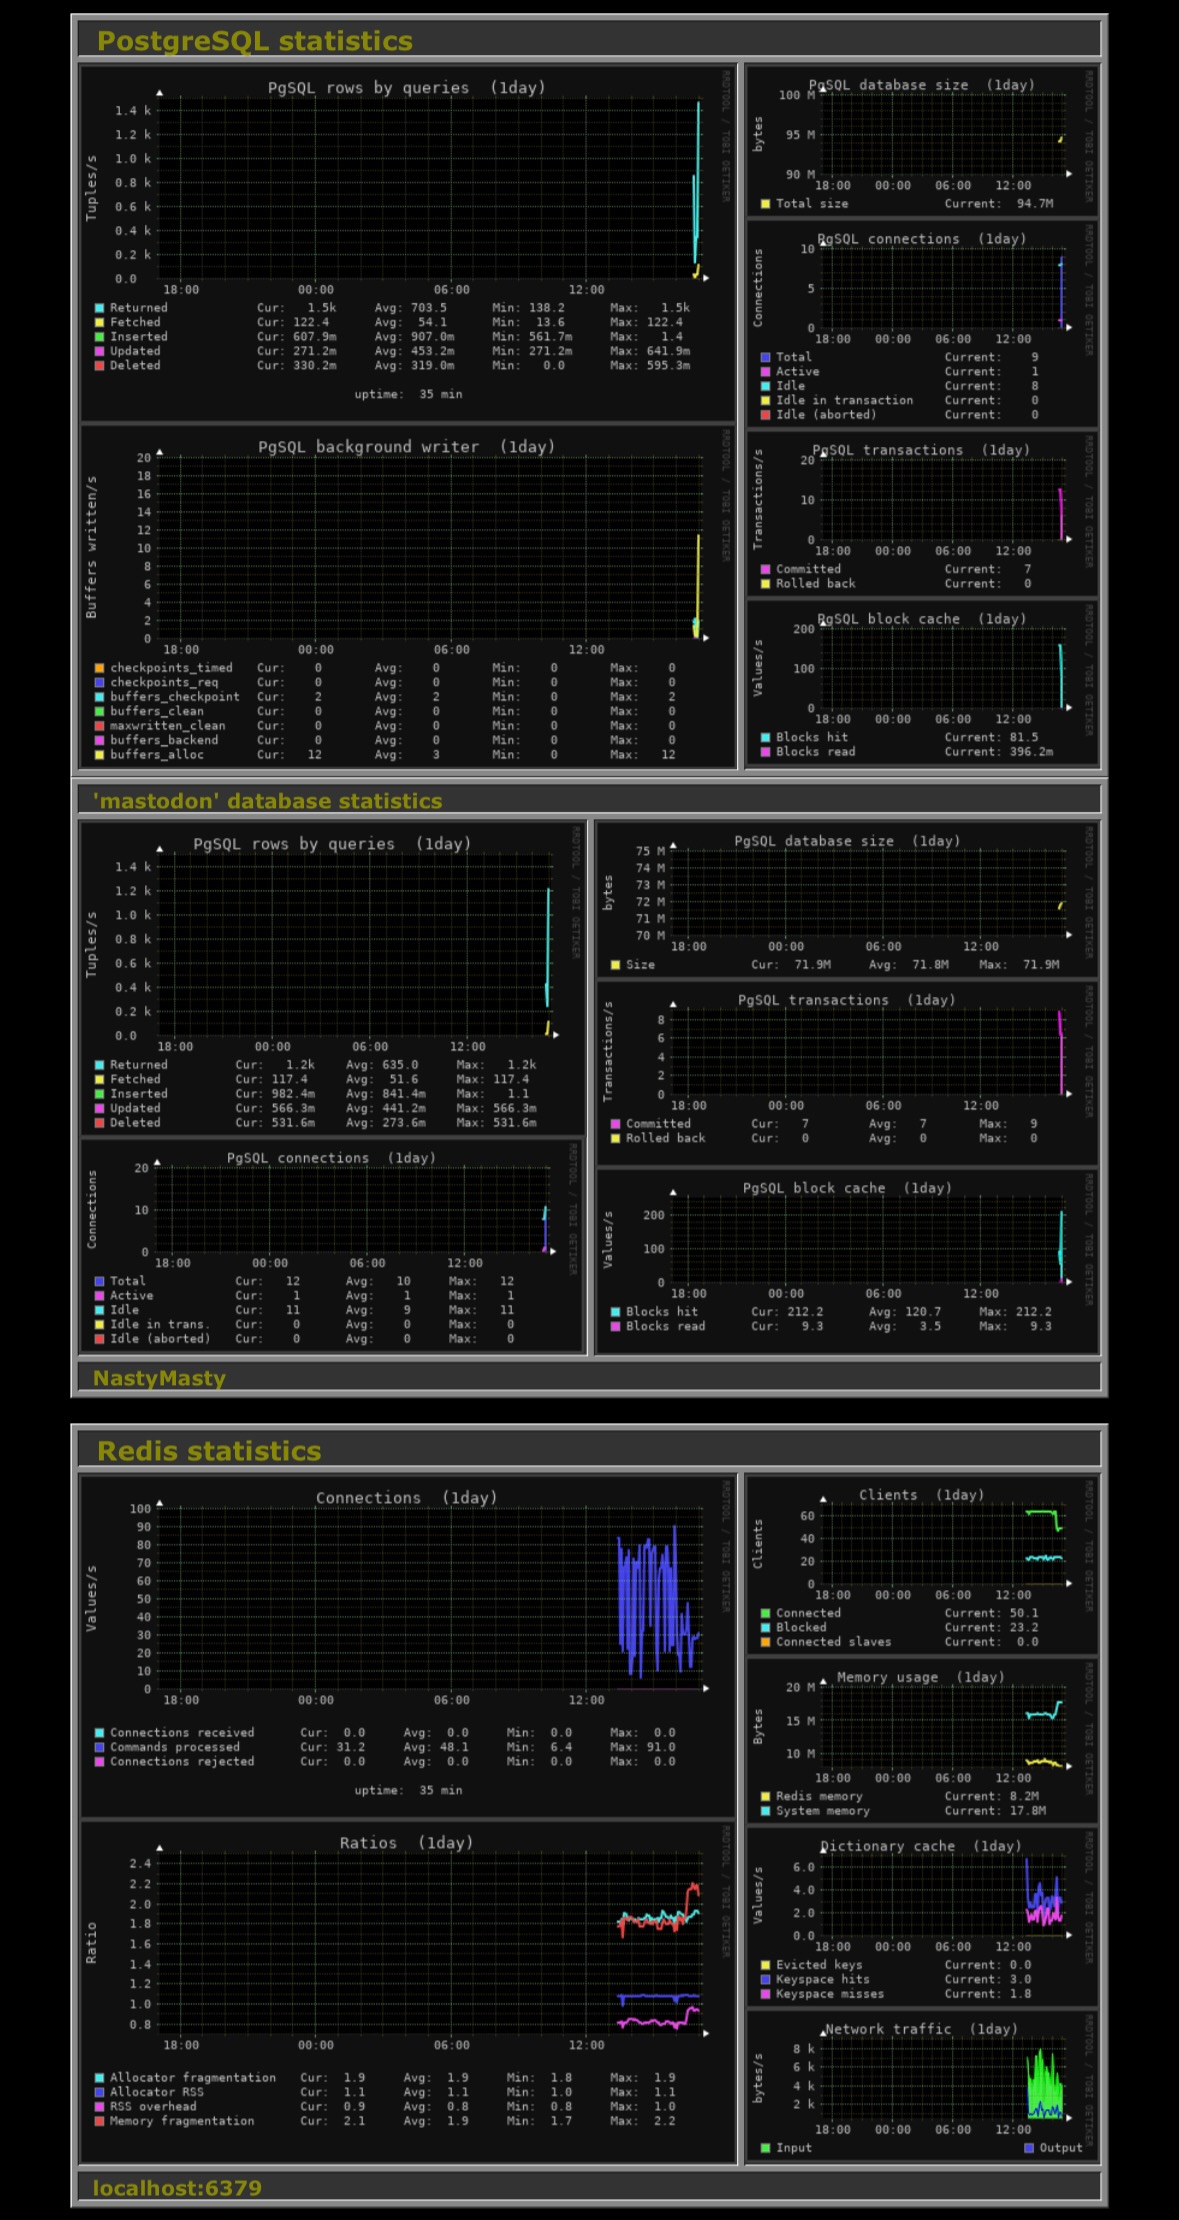
- Monitor the server. I am running a basic setup of Monitorix. It can be a little fiddly to configure, but it does provide a nice dashboard.
- Set backups. The install instructions above include the basics, I additionally run the following backup script each night and copy the backups off to another location.
#!/bin/bash
white='\e[0;37m'
yellow='\e[0;33m'

date +"%FORMAT_STRING"
date +"%m_%d_%Y"
date +"%Y-%m-%d"
var=$(date +"%FORMAT_STRING")
now=$(date +"%m_%d_%Y")
printf "%s\n" $now
today=$(date +"%Y-%m-%d")

#Mastodon app folder backup
#tar cvpzf /backup/[filename]-$now.tgz /var/www/mastodon

#Copy SSL keys
#echo -e "${yellow}Dumping SSL keys to TGZ file$white"
#tar cvpzf /backup/SSLkeys-$now.tgz /etc/letsencrypt/live

#Copy NGINX configs
#echo -e "${yellow}Dumping NGINX configs to TGZ file$white"
#tar cvpzf /backup/nginx-$now.tgz /etc/nginx/conf.d/

#Mastodon database dump
echo -e "${yellow}Dumping Mastodon Postgres database to TAR file$white"
#rm /backup/*.tar
sudo -u postgres -i pg_dump -F t mastodon > /backup/[filename]_pgsql-$now.tar
sudo s3cmd put /backup/*.t* s3://[S3bucketname]
printf "%b\n" "mastodon_pgsql-$now backup complete" >> /backup/log.txt
echo "[backupname] $now backup complete" | mailx -r notifications@[yourdomain] -s backupreport [user@email.com]
So, is it a bit of work? yes. Is it fun? also yes.
It’s fun in the #Fediverse, you should come join a server!